There are two methods for installing packs:
LOAD VOICE TO INSTRUMENT HARD DRIVE USING USB STORAGE DEVICE
To load a Voice to your instrument's hard drive using a USB storage device, use this method. The advantage of using this method is that you do not need to keep a USB storage device connected to your instrument to use the Voice and you do not need and additional USB cable to complete loading.
OR
LOAD VOICE TO INSTRUMENT HARD DRIVE USING USB STORAGE DEVICE
To load a Voice to instrument using a USB cable, use this method. The advantage of loading a Voice using this method is that you do not need to keep a USB storage device connected to your instrument to use the Voice and there are fewer steps than when loading via USB storage device.
LOAD VOICE TO INSTRUMENT HARD DRIVE USING USB STORAGE DEVICE
Product Requirements You have already imported your License Key into your instrument. You have a compatible USB Storage Device.

STEP ONE: UNZIP THE FILES
Unzip the downloaded Voice file(s) using your preferred computer program.

STEP TWO: COPY TO STORAGE DEVICE
Copy the unzipped folder which contains the Voice file(s) to the root folder of your USB storage device. Do not rename the files. Do not take the files out of the folder they came in.
STEP THREE: INSERT INTO YOUR INSTRUMENT
Insert the USB Storage Device containing your Voices into the USB port on your instrument. (located just to the right of the keyboard)

STEP FOUR: PRESS THE FUNCTION BUTTON
Now, let's load the Voice. If you are loading more than one Voice pack, you will need to repeat the following steps for each pack. Press VOICE CREATOR on your instrument. (located under Menu, to the right of the center screen).

STEP FIVE: COPY VOICE AND WAVE FILES TO INSTRUMENT HARD DRIVE
Press D. Your instrument will now display the Individual Load screen. Scroll to your USB device using TAB buttons. Using the menu at the bottom of the instrument screen, COPY all files in the Voice folder. Scroll to HD using TAB buttons. Using the menu at the bottom of the instrument screen, PASTE the files to the instrument HD. PLEASE NOTE: All files in this process must be copied to the same HD directory.

STEP SIX: PRESS EXIT
Press EXIT to return to VOICE CREATOR MENU.
STEP SEVEN: COPY LIBRARY FILES TO INSTRUMENT HARD DRIVE
Press A. Your instrument will now display the Library Load screen. Scroll to your USB device using TAB buttons. Using the menu at the bottom of the instrument screen, COPY all files in the Voice folder. Scroll to HD using TAB buttons. Using the menu at the bottom of the instrument screen, PASTE the files to the instrument HD. If you are asked to overwrite files, select "Yes."

STEP EIGHT: PRESS THE DIRECT ACCESS BUTTON, THEN THE EXIT BUTTON
Press DIRECT ACCESS and then EXIT to return to the Home screen.
STEP NINE: COPY STYLE, MULTIPAD, REGISTRATION, AND SONG FILES TO INSTRUMENT HARD DRIVE
Press D. Your instrument will now display the Individual Load screen. Scroll to your USB device using TAB buttons. Using the menu at the bottom of the instrument screen, COPY all files in the Voice folder. Scroll to HD using TAB buttons. Using the menu at the bottom of the instrument screen, PASTE the files to the instrument HD. Again, press DIRECT ACCESS and then EXIT to return to the Home screen. Repeat this process for the Multipads, Registrations, and Songs by pressing the relevant LCD button (E for Multipads, J for Registrations and A for Songs) and copying all files to the same folder on your hard drive.
STEP TEN: REMOVE USB DRIVE
Once copying is completed, remove the USB stick from the keyboard.

STEP ELEVEN: PRESS THE VOICE CREATOR BUTTON
Press VOICE CREATOR on your instrument. (located under Menu, to the right of the center screen).
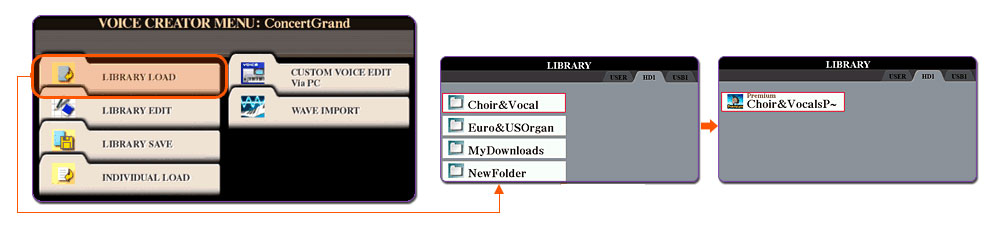
STEP TWELVE: SELECT AND LOAD YOUR CHOICE
Press A. Your instrument will now display the Library Load screen. (If your HD storage device is not displayed, use the TAB buttons to select it.) Select the desired folder of the Pack or Voice you wish to load by pressing the button next to it one time. (Some unzipping software creates an additional folder, in which case you will need to press two times.) Press F to load the file. You'll be taken to the Main screen and see the loading status in the upper left hand corner. It may take a few minutes to complete the loading process.
LOAD VOICE TO INSTRUMENT HARD DRIVE USING USB CABLE
Product Requirements You have already imported your License Key into your instrument. You have a USB Cable.

STEP ONE: CONNECT USB CABLE
Connect a USB 2.0 cable between your computer and your instrument. Plug the hexagonal end of the USB 2.0 cable into the "To Host" port on the rear of the instrument and plug the rectangular end into your computer.

STEP TWO: PRESS MUSIC FINDER AND POWER ON/OFF BUTTON
Restart your instrument in hard-disk mode by pressing MUSIC FINDER (located just to the right of the instrument's screen) while starting up the instrument. See your instrument's Owner's Manual for details.
STEP THREE: UNZIP THE FILES
Unzip the downloaded Voice file(s) using your preferred computer program.
STEP FOUR: COPY VOICE FILES TO INSTRUMENT
Open the instrument's hard drive (e.g. "TYROS3_HD") from your computer and copy the unzipped folder containing the Voice file(s) from your computer to the instrument. Once copying is complete, go to the next step.
STEP FIVE: PRESS EXIT
Restart the instrument by pressing EXIT. (located under Menu, to the right of the center screen). You may now load the Voice.
STEP SIX: PRESS PRESS THE VOICE CREATOR BUTTON
Now, let's load the Voice. If you are loading more than one Voice pack, you will need to repeat the following steps for each pack. Press VOICE CREATOR on your instrument. (located under Menu, to the right of the center screen).
STEP SEVEN: SELECT AND LOAD YOUR CHOICE
Press A. Your instrument will now display the Library Load screen. (If your HD storage device is not displayed, use the TAB buttons to select it.) Select the desired folder of the Pack or Voice you wish to load by pressing the button next to it one time. (Some unzipping software creates an additional folder, in which case you will need to press two times.) Press F to load the file. You'll be taken to the Main screen and see the loading status in the upper left hand corner. It may take a few minutes to complete the loading process.